In this tech blog we'll be following on from a previous one we posted about physics in GameMaker Studio 2. If you haven't read through that one yet, then we recommend that you do, and that you download the attached *.yyz example from that article as this one follows on from where we left off, and will continue to build on what we have already.
In this article, we are going to leave the object interface behind and delve into the GML code for physics in GameMaker. This is a necessary step, as creating physics objects from the UI is fine for very basic stuff, but if you want to have any control over a physics enabled instance, you need to use code as there are no equivalent Drag and Drop™ actions for them. However, as you will see, the transition to code is easy enough as long as you have grasped the fundamentals and have a bit of patience!
CODING FIXTURES
In our previous article we set up a room, created some objects and gave those objects some physical properties through the GameMaker Studio 2 object editor. We are now going to convert those UI physics properties into coded physics properties so that we can later permit the user to interact with them. So, to start with, open up the object obj_Floor and give it a Create Event. In this event, we'll add a code block with the following code:
var fixture = physics_fixture_create();
physics_fixture_set_box_shape(fixture, sprite_width / 2, sprite_height / 2);
physics_fixture_set_density(fixture, 0);
physics_fixture_set_restitution(fixture, 0.1);
physics_fixture_set_friction(fixture, 0.2);
physics_fixture_bind(fixture, id);
physics_fixture_delete(fixture);
Let's just go through what's happening here...
We create a fixture which is the combination of the shape and the properties of a physics body.
We set the fixture shape to be a box. This function takes half width and half height to create a rectangular shape, and it will be bound to the origin of the sprite, where the final size will be the half width/height on either side of the origin (giving full width/height)
We set the density to 0 (it is a static instance remember), and then a couple of other basic properties. Note that we do not need to set ALL the available properties like linear damping etc... as for a static fixture they are not required.
We bind the fixture to the instance, effectively transferring the physical properties and shape to the instance.
We delete the parent fixture, since we don't need it any more and to save memory.
You may be wondering why we delete the fixture if that is what we need to give the instance physical properties? Well, let's abstract it out for a moment and think about objects and instances. As you should know, an object is like a "blueprint" and an instance is what that blueprint creates. So objects are never present in rooms, it is always an instance of that object, and an instance can also be changed after creation to use different variable values or call different scripts, etc... Fixtures work in the same way! You create a "blueprint" fixture which can be then be bound to an instance. This bound fixture is what is actually created and used in the room for the physics simulation, not the blueprint fixture, so we can delete this "blueprint" when we are finished binding a copy to the instance.
If you add this code to the static obj_Floor object (and switch off "Uses Physics" in the Object Editor as binding the fixture will flag the instance as physics enabled), you can test again and you shouldn't notice any difference at all when the project runs.
It is worth noting that since the binding of the fixture occurs after the instance has been created, you can set the x or y scale in the room editor for the instance and since we set the fixture using these values your instance will have a fixture created of the same size. This can't be done with the UI physics as those are bound at the same time as the instance is created. You can test this by going into the room editor and stretching the obj_Floor instances along the x or y axis and running the example again.
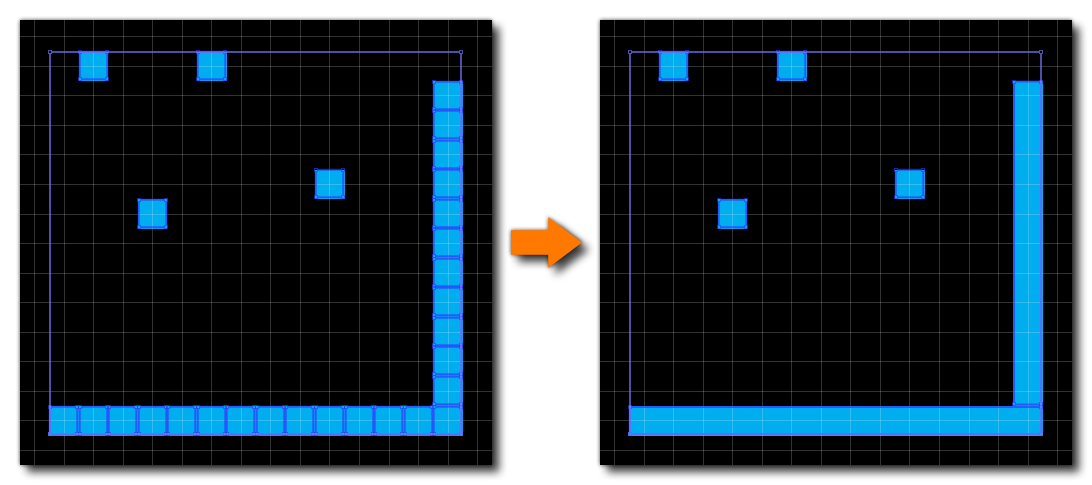
You can now do the same for the obj_Block and obj_Circle objects, disabling physics in the Object Editor and adding code to create the fixture in the Create Event. The code itself should be straightforward for you, as you all have to do is use the same values that we had in the Physics section of the Object Editor, applying each to the appropriate function. Use the manual here for help, as it has examples for all the required functions.
CODING A POLYGON FIXTURE
Polygon fixtures are slightly different to the basic box and circle fixtures, as you have to define the positions of each point of the polygon though code. Let's look at the code for binding a polygon fixture to out obj_Triangle object and then explain it:
var fixture = physics_fixture_create();
physics_fixture_set_polygon_shape(fixture);
physics_fixture_add_point(fixture, 0, -(sprite_height / 2));
physics_fixture_add_point(fixture, sprite_width / 2, sprite_height / 2);
physics_fixture_add_point(fixture, -(sprite_width / 2), sprite_height / 2);
physics_fixture_set_density(fixture, 0.8);
physics_fixture_set_restitution(fixture, 0.1);
physics_fixture_set_linear_damping(fixture, 0.6);
physics_fixture_set_angular_damping(fixture, 0.6);
physics_fixture_set_friction(fixture, 0.2);
physics_fixture_bind(fixture, id);
physics_fixture_delete(fixture);
The code is pretty much the same as for the previous fixtures, only we have an extra function in there which is used to define the points of the polygon. You must call this function at least three times, as you cannot have a polygon with less than three points or you'll get an error, and you cannot call it more than 8 times as you cannot have a polygon fixture with more than 8 points. Also note that the points are defined in local space. What this means is that the polygon points are not defined using room coordinates, but rather around a (0, 0) point, which would be the "center" (origin) of the fixture.
NOTE: We use the sprite width/height values in the code for simplicity so the fixture "fits" the sprite, but in reality the fixture is independant of the sprite and the points can be anywhere. This goes for the other fixture shapes too.
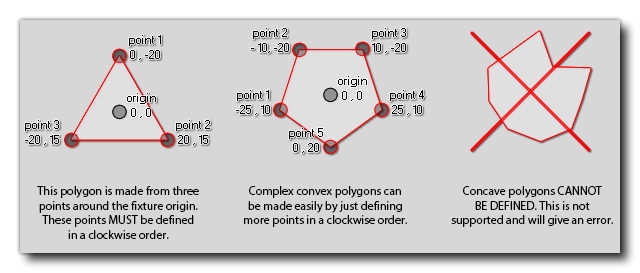
Hopefully that image helps you to understand the point positioning easier. If you notice the text also mentions that the points must be defined in a clockwise order, otherwise the game will error, and that you cannot create concave fixtures. That doesn't mean you can't ever create concave fixtures, as you can, but just not in this way! We will now look and see how it can be done.
MULTIPLE FIXTURES
Since a fixture is really only a combination of properties and a shape and is independent of the instance they are bound to, they can be combined. This is done by binding multiple fixtures to a single instance so that the instance will use the combined shape as a collision mask along with the properties defined for all the fixtures. So, to can see how that works, we're going to add a star shaped fixture to our example. You can use the one below, or create your own.
Now, once you've created a sprite with the star image, make a duplicate of our object obj_Triangle and call it obj_Star and assign it our new sprite. Now open the Create Event, and copy and paste ALL the code for the triangle polygon fixture twice, such that you have two sets of identical code. Change the polygon points in the first code block to:
physics_fixture_add_point(fixture, 0, -(sprite_height / 2));
physics_fixture_add_point(fixture, sprite_width / 2, 8);
physics_fixture_add_point(fixture, -(sprite_width / 2), 8);
And then change the points in the second one to:
physics_fixture_add_point(fixture, 0, sprite_height / 2);
physics_fixture_add_point(fixture, -(sprite_width / 2), -8);
physics_fixture_add_point(fixture, sprite_width / 2, -8);
Your object should look like this now:
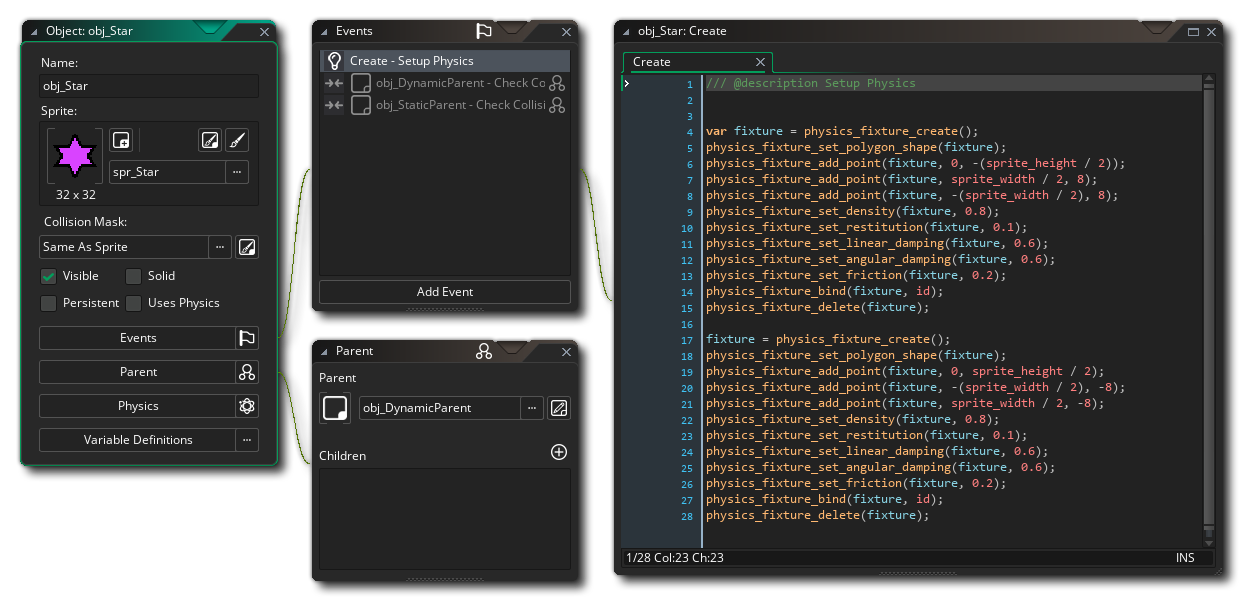
If you now fix up the Step Event of the obj_Control object to spawn the star object, you can see when you test the game that you now have concave shapes. This is just a simple example, but with a little bit of planning and a bit of maths, you can add multiple fixtures to a single instance to achieve many different effects. You can even create full levels from one instance and multiple bound fixtures!
MOVEMENT
The last thing we are going to cover in this tech blog, is how to move instances around in a physics enabled room. You can't just set the speed and direction and off it goes, since this is physics we are talking about here and the whole point is to try and get something approaching realistic action/reaction. So, instead of speed and direction we use impulses and strong...
IMPULSES AND FORCES
An impulse is when you apply a physics force to an instance or instances and this force sets a new velocity and direction, irrespective of the current velocity and direction of the instance. So if an instance is moving right and you give it an impulse upwards, the instance will suddenly move straight upwards. In GameMaker Studio 2, impulses are great for things like canons and player movement.
Impulses come in two types, local and relative. Local impulses are positioned relative to a local (0,0) position, as illustrated in this image:
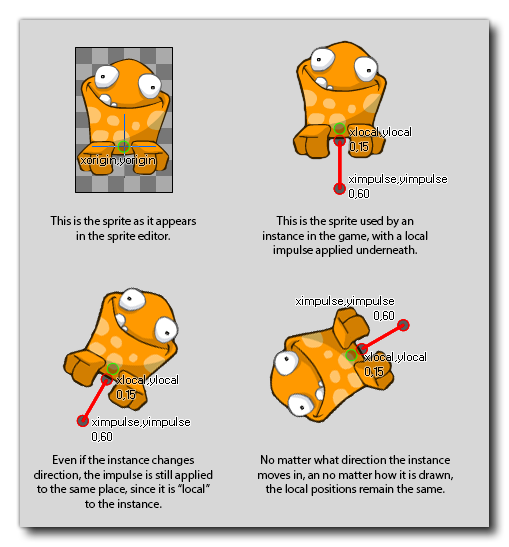
This type of impulse is great for creating rocket ships, or jumping mechanisms as you can ignore the rotation and position of the instance when using them.
The relative impulse is positioned based on the room coordinates, so if you have an instance at (400, 500), and place an impulse at (300, 500), it would give the instance a "push" from the left.
Now, you don't just give a single position for an impulse. You have to give a second one, since the magnitude and direction of the impulse is governed by the length and direction from a (0,0) point. This is called a vector and if you have trouble visualising this, just think of a clock face with a hand that moves around. The center of the clock is the (0,0) position, and the position of the end of the hand is the (xpos, ypos) of the impulse vector - the direction that the hand points in is the direction we want the impulse to go in, and the length of the hand the power to use.
To add an impulse to our small example, open up obj_Control and in the Step Event, after all the other code, add this:
if mouse_check_button(mb_right)
    {
    // Have each dynamic instance run the following code
    with (obj_DynamicParent)
        {
        // Find the direction from the mouse pointer to the instance
        var dir = point_direction(mouse_x, mouse_y, x, y);
        // Apply the impulse to the position the dynamic instance occupies, using the previously calculated direction to set the force part of the vector
        physics_apply_impulse(x, y, lengthdir_x(10, dir), lengthdir_y(10, dir));
        }
    }
Forces are similar to impulses in the way they are programmed (ie: you have relative and local forces, and their strength and direction are set from a vector), but forces are much subtler than impulses and will add to the instances current speed, direction and rotation, rather than directly set it. If you change the above code to use a force instead of an impulse (use the function physics_apply_force()), you'll see that the effect isn't very noticeable as the force is being added to the stronger pull of gravity as well as the existing speed and direction vector. Change the length value for the vector to 100, for example, and you'll see much more effect. Forces are great for things like magnets, gravity and propulsion.
SUMMARY
That's it for this tech blog, and we hope that this has helped you to further understand the physics integration in GameMaker Studio 2. However this is not quite the end of our mini-series as there is still one further basic physics idea that you need to learn... Joints! The physics setup in GameMaker Studio 2 permits you to link fixtures together and so create complex mechanisms that react realistically. So stay tuned for the next physics tech blog where we'll cover this!
You can download a *.yyz for this tech blog showing the finished example from here.

