We've had three tech blogs now about the GameMaker Studio 2 physics system and how it permits you to create fast and efficient physics simulations in your projects. However, they've all focused on what is known as "rigid body" physics, mainly because that is what the underlying physics engine "Box2D" does best. That doesn't man you can't do "soft body" physics simulations though! Some time ago those clever chaps at Google expanded the Box2D library to include their "Liquid Fun" module, which adds physics particles, and gives you the ability to create fluid-like particle simulations as well as particle based soft-bodies. This module is included as part of the GameMaker Studio 2 physics system and in this final tech blog in our series on using physics, we'll cover some of the things you can do with it.
If you haven't already read through the previous parts of this series, you can find them from the links at the very top of this article.
These previous tech blogs are not essential for completing this one, but if you haven't used physics before in GameMaker Studio 2 then it is highly recommended that you give them a read through before continuing, as this article assumes you already have a good working knowledge of the physics functions and of GML in general.
THE BASICS
As with the normal particle system (for creating graphics effects) the physics particles are designed to be a "fire and forget" system, in which you set up a series of properties and behaviours then create your particles and leave them to do their thing. The particles themselves can be created on an individual level, or as a group, and you can set different properties for each particle or group, as well as set some global properties which will affect all particles.
Now, in your physics games you should know that you can only have a single particle system, and that setting the global properties for that system will not only change all subsequent particles created, but those already in the game room. So, if you use the function
physics_particle_set_radius(radius);
for example, to change the radius of the particle, you will change the radius of all the particles already in the room (note that the particles that you create are really just single, circular fixtures and their global properties are pretty much the same as those that you would set for a regular fixture, like density, linear damping radius, etc... ).
That's not to say that you can't have different properties for each particle or each particle group, because you can! You can set a series of flags for each group or particle which changes their physical properties in some way, and you can also assign each particle or group to a specific user category so that you can change their flags using the appropriate functions at any time without affecting other particles in the physics simulation.
FLAGS
Since most of the particle functions are pretty much self-explanatory (and the manual has most of the information that you require to use them), we are going to concentrate our attention on only a few details in this tech blog rather than create an example for you to play with (although you can download a little test project that shows some of these features at the end of the article). The first thing we'll look at is the setting of particle "flags". The method used for setting flags on your particles is called bit masking and it can be quite confusing, especially if you've never used any type of binary maths! So let's have a look at what flags are available for our particles and how to use "bit masking" to set them...
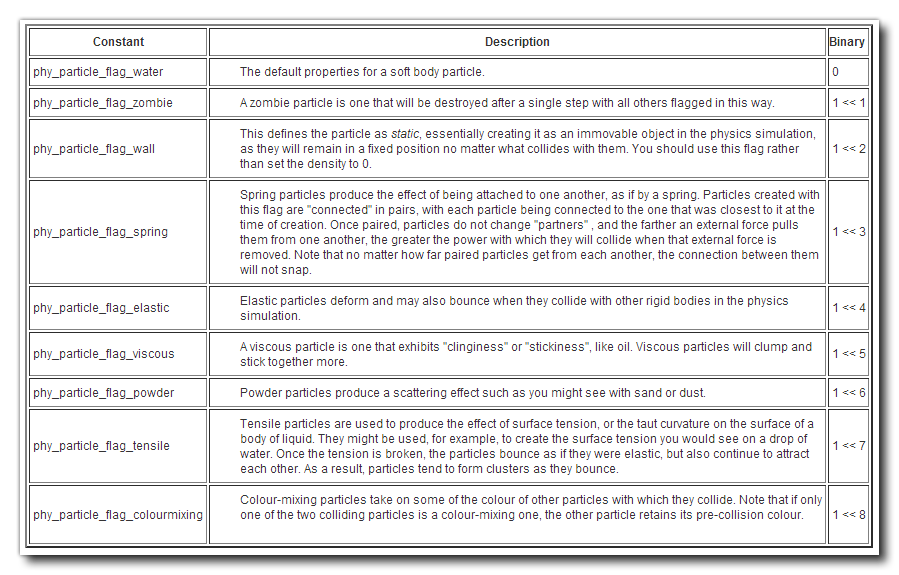
To start with, let's look at the available particle types:

NOTE: 1 << 0 is not used for anything.
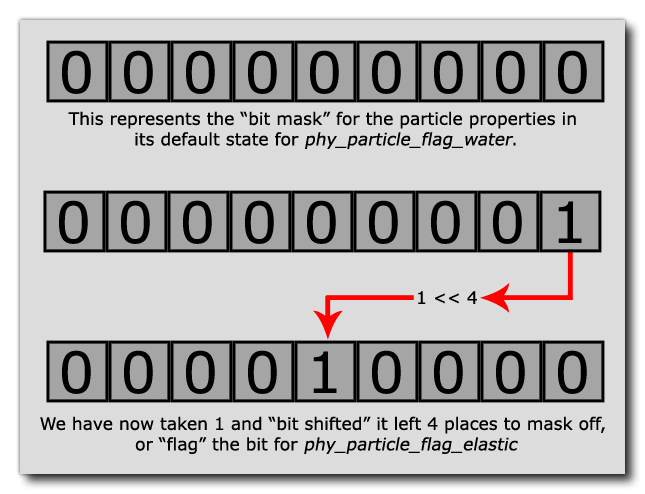
As you can see, each of these constants has a binary representation, like (1 << 4) for the GML constant phy_particle_flag_elastic. What this means is that the constant represents 1 bit-shifted left 4 places. The image below should help you visualise this:

When you use binary numbers, you are limited to setting a "bit" to either 1 or 0, like switch that can either be on or off. This means that we can create a "bit-mask" of data, which is basically a row of zeros and ones, where each position represents a "switch" which will mark a certain property of our physics particle as being active or not. In the above image we have now flagged the particle as being elastic, but using this system you are not limited to setting particles to be of one specific type, since you can mask off as many bits as you need by using the bitwise "or" operator (which is "|" in GML).

In the above image you can see that we have a variable "flags" which holds a single value representing each of the bits set to change the particle properties. So, in the particle functions, when you see the "flags" argument, you simply have to select the constants required for the particle type you wish to create and bitwise "or" them together to get a single value, which is what you would use in the function.
Note that not all particle types are compatible with each other and you may get some strange behaviours when setting, for example, a dust particle to have surface tension, so take some time to experiment with setting different flags and seeing what effect each one has on the particle system as a whole.
This type of bit-masking mechanism is used extensively with particles when setting individual properties, group properties, and also when getting data, so it is important that you understand how it works, and hopefully this short explanation has made it easier for you!
GROUPS
As mentioned previously, you can create individual particles, or particle groups. For individual particles, you set some flags and give a position and a velocity vector and a particle is created to go about it's business, but with groups you create a number of particles all at once within a defined shape. These particles will all have the same properties and will behave as a whole until they collide with any fixture in your game, at which point their behaviour will change depending on the flags that you have set for them.
For example, a circular particle group that has the default flags (ie: water) will break apart on collision with a fixture, but if you have set the "elastic" flag then it will not break apart, but rather bounce and behave as if the whole group was a single entity. This behaviour is what gives the impression of soft-body physics, even though we are still using a rigid-body physics library.
DRAWING PARTICLES
As a final note for using physics particles we are going to look at how they are drawn. There are two functions for this:
physics_particle_draw(typemask, category, sprite, subimg);
physics_particle_draw_ext(typemask, category, sprite, subimg, xscale, yscale, ang, col, alpha);
When you create a particle you also supply a colour and alpha value for it, and these values will be used for the basic drawing, while the typemask is a mask of the properties to draw and the category is the user category that you assigned the particle. The category is an arbitrary integer value that is assigned when you create the particle and then used to identify them in this (and other) functions, and when combined with the typemask it permits you to very accurately select and draw only those particles that you wish.
For example, imagine that we have created a number of particles all with different flags and different categories. We only want to draw those particles that are flagged as viscous and have surface tension across all user categories. For that we would have this:
var mask = phy_particle_flag_viscous | phy_particle_flag_tensile;
physics_particle_draw(mask, 0, spr_Blob, 0);
This would draw all the particles that have flags matching the given mask in all user categories (setting the categories value to 0 tells GameMaker Studio 2 to include all categories in the function, so you cannot use 0 yourself to define a category), and they would be drawn using the given sprite, blended with the colour and alpha values that were specified when the particle was created.
The extended version of this function works the same way, only it gives you more control over the sprite properties that are used to draw the particle in the room, and you can also use the physics_particle_get_data() function to get the x/y coordinates of the particle and then draw it yourself using the standard draw commands.
SUMMARY
Although this article hasn't gone into too much depth on the physics particle functions themselves (the manual covers that!), we hope that it has helped clear up the basics behind how particles are defined and the properties that they can have, as that is undoubtedly the most complicated part of setting them up.
The important part to take away with you from all this is that bit masking is a common technique in programming and is very useful since it is fast and (once you understand how binary data is stored) very easy to use. GameMaker Studio 2 has made it even easier for you when using physics particles by providing constants for everything, but you should take note of the method used as you can create your own binary flags and masks easily using enums or macros and then use them for a multitude of other tasks when making your games, as they are a very fast and compact way to store data.
Finally, you can download a small test project that shows the basics of physics particles from this link. Run the project then use the middle mouse button to spawn some "water" particles, or the space bar to spawn a "slime ball". Have fun!

